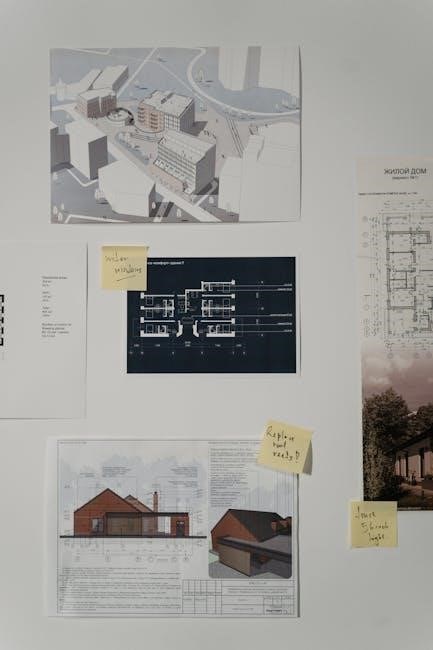
Technical drawing with engineering graphics, often found as a PDF resource, is a foundational skill. It’s a visual language used to communicate designs effectively,
spanning from hand-drawn sketches to sophisticated CAD systems.
What is Technical Drawing?
Technical drawing, frequently accessed as a PDF guide in engineering graphics, is the art of creating precise, detailed representations of objects. It utilizes standardized conventions – lines, symbols, dimensions – to convey design intent unambiguously.
Unlike artistic sketches, technical drawings prioritize accuracy and clarity. These drawings serve as blueprints for manufacturing, construction, and various engineering applications. Resources like Giesecke’s textbook provide comprehensive instruction, while CAD software facilitates digital creation and modification of these vital plans.
Importance of Engineering Graphics
Engineering graphics, often studied through a technical drawing PDF, are crucial for effective communication within the engineering field. They bridge the gap between ideas and physical realization, enabling designers to convey complex information clearly.
Accurate drawings minimize errors in manufacturing and construction, saving time and resources. Mastering these skills, as detailed in resources like the GSFC X-673-64-1F manual, is essential for interpreting designs and utilizing CAD systems effectively, ensuring project success.
Historical Development of Technical Drawing
The evolution of technical drawing, documented in texts like Giesecke et al.’s work (often available as a PDF), traces back to ancient civilizations. Early forms focused on basic geometric representations.
The Renaissance saw advancements with perspective projection. The Industrial Revolution spurred standardization, leading to modern practices and the development of Y14.5M standards. Today, CAD software builds upon this history, offering powerful tools for creating and sharing engineering graphics, as outlined in various PDF guides.

Fundamentals of Engineering Graphics
Engineering graphics fundamentals, detailed in resources like the technical drawing PDF by Giesecke, cover lines, geometry, and dimensioning – essential for clear communication.
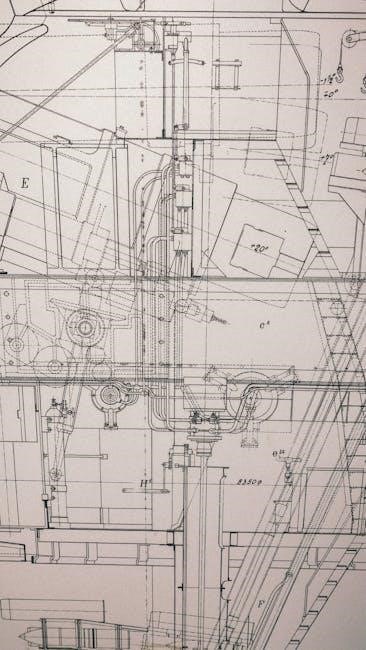
Types of Lines in Technical Drawing
Technical drawing relies on standardized line types for clarity, as detailed in engineering graphics PDF resources. Visible lines represent edges, while hidden lines (dotted) show obscured features. Centerlines define symmetry, and dimension/extension lines indicate measurements. Section lines denote material removal in sectional views.
Line weights also vary; thick lines for visible edges, thinner for dimensions. Proper line usage, as taught in texts like Giesecke’s, ensures drawings are easily interpretable and adhere to standards like Y14.5M-1982.
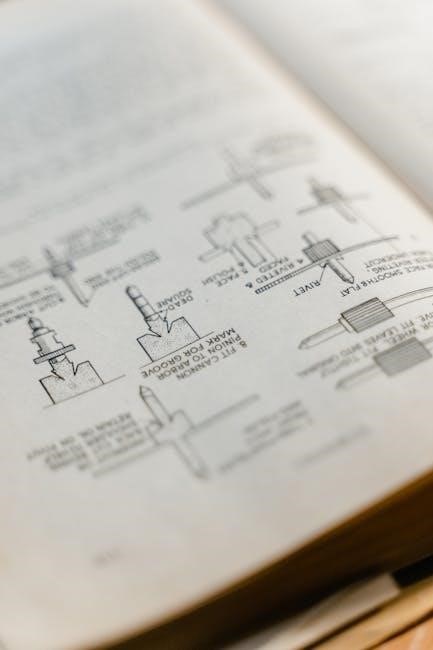
Geometric Constructions
Geometric constructions form the basis of accurate technical drawing, often detailed in engineering graphics PDF guides. These involve using tools like compasses and straightedges to create precise shapes – bisecting angles, drawing perpendiculars, and creating ellipses.
Mastering these constructions, as emphasized in resources like MIT OpenCourseWare’s Design Handbook, is crucial for developing spatial reasoning and building complex drawings. They underpin all subsequent drafting and CAD work, ensuring accuracy and proportionality.
Dimensioning and Tolerancing (Y14.5M-1982 Standard)
Dimensioning and tolerancing, governed by the Y14.5M-1982 standard, is critical for conveying manufacturing intent in technical drawings. Engineering graphics PDF resources detail how to apply dimensioning rules – specifying sizes and locations with precision.
Tolerances define permissible variations, ensuring parts function correctly. The GSFC X-673-64-1F manual highlights the importance of adhering to this standard for clear communication and interchangeability, vital for engineering projects.

Orthographic Projection
Orthographic projection, detailed in technical drawing with engineering graphics PDF guides, represents 3D objects using 2D views—front, top, and side—for precise depiction.
Principles of Orthographic Projection
Orthographic projection, extensively covered in technical drawing with engineering graphics PDF resources, establishes a method for representing three-dimensional objects in two dimensions. This is achieved by projecting the object’s shape onto mutually perpendicular planes.
Key principles include projectors being perpendicular to the projection plane, resulting in true shape and size of features visible on that plane. Multiple views—front, top, and side—are necessary to fully define the object’s geometry. Understanding these principles is crucial for accurate interpretation and creation of engineering drawings.
First-Angle and Third-Angle Projection
Technical drawing with engineering graphics PDF materials detail two primary projection systems: first-angle and third-angle. First-angle projection places the object between the observer and the projection plane, common in Europe and much of the world.
Third-angle projection positions the object behind the projection plane, prevalent in the United States and Canada. The difference lies in how views are arranged relative to each other; understanding this distinction is vital for correctly interpreting drawings based on the specified standard.
Views in Orthographic Projection (Front, Top, Side)
Technical drawing with engineering graphics PDF resources emphasize the core views in orthographic projection: front, top, and side. These views provide a complete visual representation of an object. The front view shows the object as seen directly, while the top view depicts it from above.
The side view reveals the object from the side, creating a three-dimensional understanding. Proper alignment and consistent projection methods are crucial for accurate interpretation, as detailed in standard guides.

Auxiliary Views
Technical drawing with engineering graphics PDF materials explain auxiliary views clarify hidden features. They’re essential for accurately representing inclined or angled surfaces, enhancing clarity.
Necessity of Auxiliary Views
Technical drawing with engineering graphics PDF resources demonstrate that standard orthographic projections sometimes fail to fully reveal the true shape and size of inclined surfaces. Auxiliary views become necessary when these surfaces aren’t truly horizontal or vertical. They provide a clear, unambiguous representation, crucial for manufacturing and analysis.
Without them, dimensions can be misinterpreted, leading to errors. These views project onto a plane perpendicular to the inclined surface, offering a direct and accurate depiction. This ensures proper understanding and execution of the design intent, as highlighted in various instructional materials.
Types of Auxiliary Views
Technical drawing with engineering graphics PDF guides detail several auxiliary view types. Full auxiliary views show the entire inclined surface, while half auxiliary views depict only a portion. Partial auxiliary views are used when only specific features require true-size representation.
Additionally, sectioned auxiliary views combine the benefits of both sectional and auxiliary projections, revealing internal features on inclined planes. Understanding these distinctions, as presented in comprehensive textbooks, is vital for accurate interpretation and creation of engineering drawings.
Applications of Auxiliary Views
Technical drawing with engineering graphics PDF resources highlight the crucial role of auxiliary views in depicting inclined or oblique surfaces accurately. They are essential for illustrating features not truly visible in standard orthographic projections.
Common applications include showcasing beveled edges, angled holes, and cam profiles. These views are frequently used in mechanical engineering to define complex geometries, ensuring proper manufacturing and assembly. Mastering their use, as detailed in instructional materials, is paramount for effective communication.

Sectional Views
Technical drawing with engineering graphics PDF guides explain sectional views reveal internal features. They use cutting planes to display hidden details, enhancing understanding of complex designs.
Purpose of Sectional Views
Technical drawing with engineering graphics PDF resources emphasize that the primary purpose of sectional views is to reveal internal features not visible through standard orthographic projections. These views simplify complex parts, allowing for a clearer understanding of internal construction and relationships.
By “cutting” through an object with an imaginary plane, internal details become readily apparent. This is particularly useful for visualizing hidden components, cavities, or thicknesses. Sectional views also reduce clutter by eliminating hidden lines within the sectioned area, improving drawing readability and clarity.
Types of Sections (Full, Half, Offset, Revolving)
Technical drawing with engineering graphics PDF materials detail several section types. Full sections reveal the entire interior. Half sections show one-quarter of the object, combining a section with a hidden view. Offset sections use staggered cutting planes to display features that would be missed with a single plane.
Finally, revolving sections show features as if viewed from a rotating plane, useful for illustrating repetitive features like ribs or spokes. Understanding these types is crucial for accurately representing internal details.
Hidden Lines in Sectional Views
Technical drawing with engineering graphics PDF resources emphasize careful use of hidden lines in sections. Generally, hidden lines are minimized within the sectioned area to avoid clutter, as the sectioning process itself reveals hidden features. However, hidden lines are used for dimensioning purposes or to clarify features not directly intersected by the cutting plane.
Outside the sectioned portion, hidden lines may be omitted if redundant, maintaining drawing clarity. The MIT OpenCourseWare handbook highlights this practice for cleaner representations.

Isometric Projections
Technical drawing with engineering graphics PDF materials detail isometric projections as a 3D representation method. They utilize an isometric scale for accurate depiction, showing all three axes equally.
Principles of Isometric Projection
Technical drawing with engineering graphics PDF resources explain that isometric projection represents a 3D object in a 2D plane. All three principal axes (length, width, and height) appear equally foreshortened, typically at 120-degree angles to each other.
This method doesn’t rely on perspective, maintaining parallel lines. Objects are visualized as if viewed from a high corner, offering a realistic, though not photographically accurate, representation. Understanding these principles is crucial for creating clear and interpretable isometric drawings.
Isometric Scale
Technical drawing with engineering graphics PDF guides detail that, unlike orthographic projections, isometric drawings require a specific scaling consideration. Measurements along the isometric axes aren’t true length; they appear compressed.
To accurately represent dimensions, an isometric scale is employed, often approximating 0.816 or 2/√3. This factor adjusts measurements to reflect their apparent length in the isometric view, ensuring proportional accuracy within the drawing. Correct scaling is vital for precise representation.
Applications of Isometric Drawings
Technical drawing with engineering graphics PDF resources showcase isometric drawings’ broad utility. They excel at visually representing three-dimensional objects in a way that’s relatively easy to understand, without the complexity of perspective.
Common applications include illustrating mechanical parts, architectural designs, and assembly instructions. Isometric views are particularly useful for quick conceptualization and preliminary design stages, offering a clear, albeit not perfectly realistic, depiction of form and spatial relationships.

Perspective Projections
Technical drawing with engineering graphics PDF materials detail perspective projections, creating realistic 3D views by representing objects as they appear to the eye.
One-Point Perspective
Technical drawing with engineering graphics PDF resources explain one-point perspective as a method where all lines converge on a single vanishing point. This technique is ideal for illustrating objects viewed head-on, like a road stretching into the distance.
It’s a fundamental skill for creating depth and realism in drawings. The vanishing point resides on the horizon line, and parallel lines recede towards it, simplifying complex spatial representation. Mastering this projection is crucial for architectural and illustrative drawings.
Two-Point Perspective
Technical drawing with engineering graphics PDF guides detail two-point perspective as a technique utilizing two vanishing points on the horizon line. This method excels at depicting objects viewed at an angle, showcasing two sides receding into space.
It’s more complex than one-point, offering a greater sense of depth and realism. Vertical lines remain vertical, while all other lines converge towards one of the two vanishing points, creating a more dynamic visual representation of form.
Three-Point Perspective
Technical drawing with engineering graphics PDF resources illustrate three-point perspective as the most complex form, adding a third vanishing point. This point resides either above or below the horizon, representing height or depth.
It’s ideal for depicting objects viewed from a high or low angle, creating dramatic and realistic effects. All three sets of parallel lines converge, enhancing the sense of spatial depth and scale, often used in architectural visualizations.
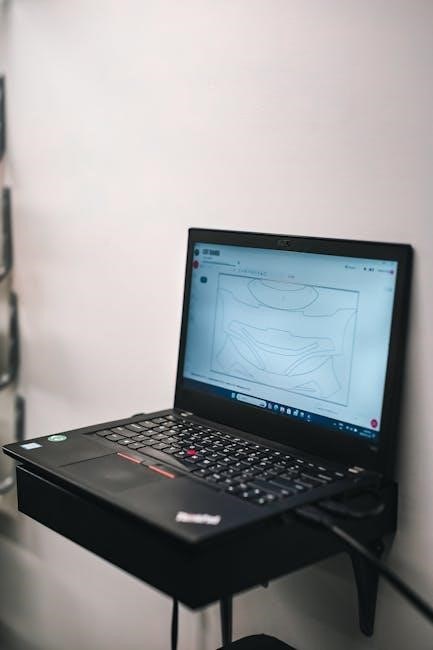
CAD Software and Technical Drawing
Technical drawing with engineering graphics PDF guides now emphasize CAD systems. These tools offer precision, efficiency, and ease of modification compared to manual drafting techniques.
CAD (Computer-Aided Design) systems have revolutionized technical drawing with engineering graphics, moving beyond traditional methods. Many PDF resources now focus on 2D drafting within these systems, offering comprehensive introductions. These systems allow for precise creation and modification of drawings.
Modern CAD software provides tools for geometric construction, dimensioning, and visualization. The Fourteenth Edition of “Technical Drawing and Engineering Graphics” highlights this transition, offering clear guidance for both hand-drawing and CAD utilization. Learning CAD is essential for modern engineering practice.
2D Drafting in CAD
2D drafting within CAD systems forms the basis of many engineering drawings. Resources like the “Technical Drawing and Engineering Graphics” PDF guide users through creating 2D documentation. This involves utilizing tools for lines, circles, arcs, and text.
Precise dimensioning and tolerancing, adhering to standards like Y14.5M-1982, are crucial. CAD simplifies these processes, ensuring accuracy and consistency. Mastering 2D drafting is a fundamental step towards more complex 3D modeling and design.
Benefits of Using CAD for Engineering Graphics
Employing CAD software, as detailed in resources like the “Technical Drawing and Engineering Graphics” PDF, offers significant advantages. CAD enhances precision, reduces errors, and accelerates the design process. It facilitates easy modifications and revisions, crucial for iterative design cycles.
Furthermore, CAD enables efficient file sharing and collaboration. The ability to create and manage complex drawings digitally streamlines workflows. Ultimately, CAD boosts productivity and improves the overall quality of engineering graphics.
Standards and References
Technical drawing relies on standards like Y14.5M-1982, detailed in manuals and PDF resources. Giesecke’s textbook and the GSFC X-673-64-1F manual are key references.
Relevant Standards (Y14.5M)
Y14.5M-1982, a cornerstone of technical drawing, dictates standardized dimensioning and tolerancing practices. This standard, often available as a PDF document, ensures clarity and consistency across engineering designs.
The GSFC X-673-64-1F manual explicitly references this standard, emphasizing its importance in aerospace applications. Adherence to Y14.5M minimizes ambiguity, facilitating accurate manufacturing and assembly. Understanding its principles is crucial for interpreting and creating engineering graphics, as detailed in resources like Giesecke’s textbook.
Giesecke, Frederick, Mitchell, Alva, Spencer, Henry, Hill, Ivan, Dygdon, John, Novak, James, Loving, R., Lockhart, Shawna, Johnson, Cindy, Goodman, Marla — Textbook Reference
The comprehensive textbook by Giesecke et al. serves as a leading resource for technical drawing with engineering graphics, often available in PDF format. It provides a clear, detailed introduction to both manual drafting and CAD techniques.
This widely-used text features “Understanding” and “Detail” sections for easy navigation, offering foundational knowledge and practical examples. It covers 2D documentation, visualization tips, and drawing variations, making it invaluable for students and professionals alike.
GSFC X-673-64-1F Engineering Drawing Standards Manual
The Goddard Space Flight Center’s (GSFC) X-673-64-1F manual establishes crucial engineering drawing standards. It references Y14.5M-1982 for dimensioning and tolerancing, vital for precise communication in technical documentation, often found alongside technical drawing with engineering graphics PDF resources.
This manual details approval processes, requiring named personnel (ENG, STRESS) to sign off on drawings. Adherence ensures consistency and clarity, essential for complex projects and maintaining quality control within engineering workflows.